Access Synology Remotely: How to Do?
Any device that has an internet connection can be used to access Synology remotely. The process of remotely accessing the Synology NAS is known as external access. Synology DSM or DiskStation manager helps you do this job. If you are wondering how to go about the process, then the information provided in this guide will be useful. All you have to do is walk through the instructions given here and then use them to remotely access Synology NAS.
How to Access Synology Remotely?
You need to enter a custom domain name in the internet browser to sign in to Synology DSM or other services to setup remote access. To access certain services directly, you can set up port forwarding rules so that you can open particular ports on your Synology NAS.
Method 1: Set Up QuickConnect
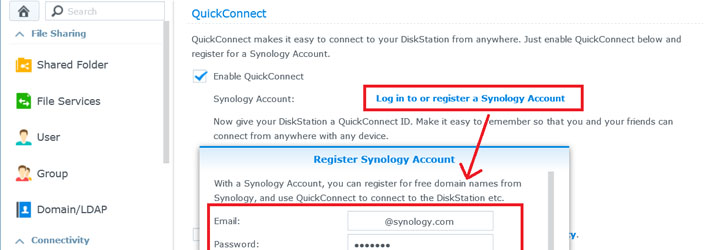
You can use QuickConnect to access DSM via a customizable ID.
- Go to Control Panel and then click External access .
- After that, click QuickConnect.
- You need to select the Enable QuickConnect option by clicking on the checkbox next to it.
- Assign an ID by typing it in the QuickConnect ID field.
- Agree to Terms and Conditions and click Apply.
- You can make changes to the settings of you want to customize them by going to the Advanced button.
This completes setting up QuickConnect. You can now use your computer to access Synology remotely using the ID that you created instead of find.synology page. On a mobile device, you can access Synology DSM using the QuickConnect ID on the Synology mobile app.
Method 2: Set Up DDNS Hostname
Dynamic Domain Name System helps you connect to Synology NAS by mapping a hostname to the IP address. Use the steps given below to access Synology DSM via DDNS:
- Access Control Panel > External Access > DDNS.
- Next, click Add.
- Make changes to the settings:
i) Hostname: Insert a hostname. E.g. abc.synology.me.
ii) Service Provider: You need to choose a service provider. Select Synology from the drop-down menu, to register for free hostname.
iii) Username or email ID: You next need to insert a username or email address for the DDNS provider.
iv) Password: Enter a password for the DDNS provider.
v) External Address: Insert the external IP address of the Synology NAS.
- You can check the settings by clicking on Test Connection.
- Finally, click on OK and the settings are saved.
Now that the DDNS hostname setup is done, you can access Synology remotely by using the DDNS hostname on an internet browser. If you have configured port forwarding, then the DDNS hostname followed by colon and port number needs to be used. The address will be something like this: abc.synology.me:5001.
The next section will help you configure port forwarding. This will help to access Synology remotely on the local network. It works by mapping the external port of the main gateway to the internal IP address of NAS.
Setting Up Port Forwarding Rules
- Select Control Panel > External Access.
- After that, select Router Configuration.
- Now, select Create.
- To launch the setup wizard, click on Set up Router.
- Click on the Start option.
- A few network settings required will be tested first.
- Once this is done. Click on Create and the Port Forwarding setup wizard will be launched.
- You can choose one of these setup methods: Built-In application or Custom port.
- Once you are done making the required changes. Click Done.
The port forwarding setup is done. This way you can use Port forwarding rules to have remote access to your Synology NAS.
Wrapping Things Up
This is all about how you can access Synology remotely or simply have Synology NAS external access. You can use any of the two methods that have been discussed above to remotely connect to Synology. We recommend you keep your external connection secure by making changes to the settings like Enable Auto Block, enable HTTPS, enable firewall, enable account protection, etc.
